
Tutorial: How to Use the Pennsylvania Mine Map Atlas
Section 3: Advanced Tools
Overlays and Base Maps
Open the Layers tab to turn your Mine Map on/off and apply a level of transparency 0 - 100
![]()
There are other data you can view in addition to the mine maps. These are called Layers and the Layer List is displayed on the right side of the Mine Map Atlas. The Layers available in the Mine Map Atlas are called Overlays, Mosaics and Base Maps.

The Overlays include the PA Coal Fields, Mine Map Index, the WPA Mine Map Index, Counties, Municipalities, Quadrangle Boundaries, State Roads, and Local Roads. The Overlays can be viewed by clicking the slider next to the overlay name. These will be displayed over the existing base map.
The Mine Map Index show the rectangular outline extent (pink boxes) of where each mine map would overlay the basemap. Click on the webmap and use the Map Found box the highlight the individual rectangular outline extent of each map.
Mosiacs include a patchwork of maps from PA Bituminous Coal Region and PA Active Underground Coal Mines. For more informations about these mosaics see the mosiac metadata.
Pennsylvania Bituminous Coal Region Mine Map Mosaic
Pennsylvania Active Underground Coal Mine Map Mosaic
Base Maps include underlying data such as Topographic maps, Aerial Imagery, and Street Maps. You can collapse/expand the Overlay, Mosaic, and Base Maps boxes by clicking the up/down arrows in the upper right corner of the layer list.
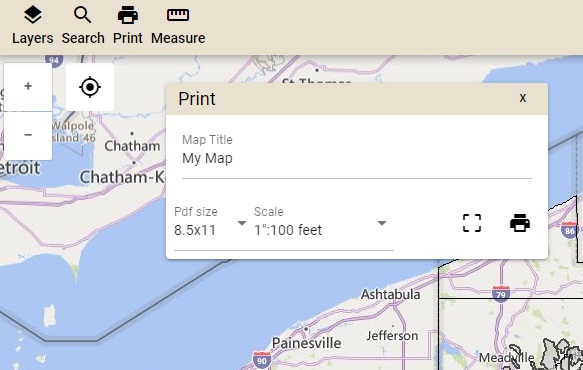
Print Map
The Print Map tab allows users to create their own map and save it as a PDF in multiple sizes and scales.
Example:To print a map, click on the Print button located at the top left of the header. Add a Title and choose the Size and Scale of your pdf. You can use the Center Print Button to move the area you want printed. NOTE: Be sure that you do not have your Pop Up blocker on since the map will be displayed to you in a new window.
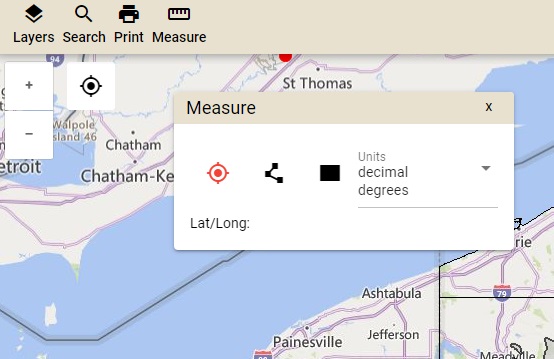
Measure
The Measure Tool allows users to measure by area, distance, or identify a location (decimal degrees or degrees minutes seconds).
Example:To use the measuring tool, click on the Measure tab in the upper right corner of the layer list.
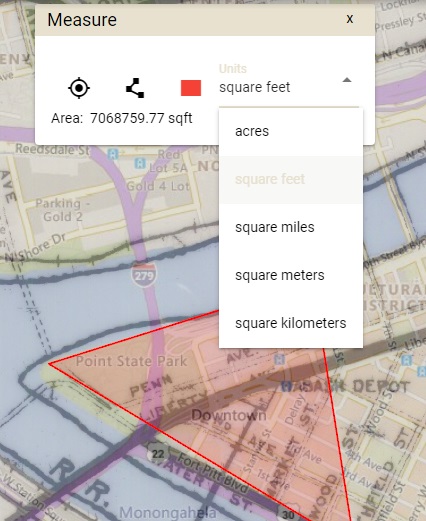
To measure area click on the Area icon. When you click on this you will see the word Acres appear to the right of the icons. This alerts you to the fact that the measurement units are currently set to acres. To change the measurement units, click on the word Acres and you will see a drop down menu with other options.
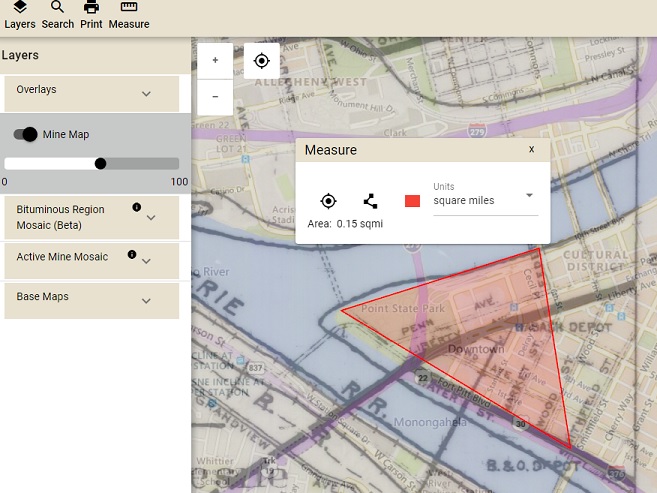
To measure, just click on your first point on the map then move your mouse to the next point you want to include in the area measure. Continue clicking until you have made a box or polygon around the area you want to measure. To finish measuring, double click on the final point. You should see a red line outlining the area you measured and the calculated area in your choosen units
View Area results by Acres, Sq Feet, Sq Miles, Sq Meters, Sq Kilometers
To measure distance click on the Distance icon. When you click on this you will see the word Feet appear to the right of the icons. This alerts you to the fact that the measurement units are currently set to feet. To change the measurement units, click on the word Feet and you will see a drop down menu with other options. You will also see the calculated distance under the Measurement Result line.

To measure, just click on your first point then double click on the second point. You should see a straight red line with your beginning and end points.
You can change the measurement units to feet, miles, meters, or kilometers, depending on your needs.
Identify Location
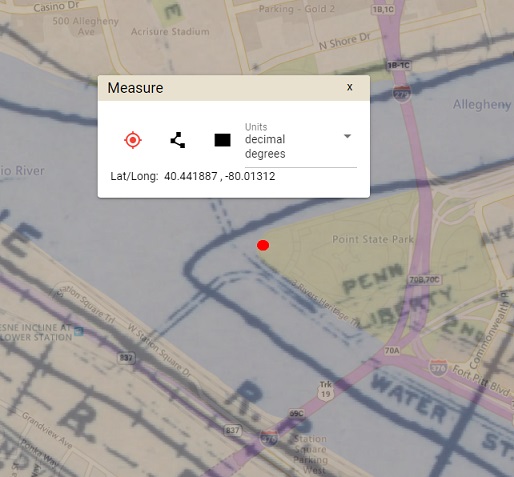
The Identify Location tool allows you to identify a location by latitude and longitude.
Example:To identify a specific location by latitude and longitude, in decimal degrees or degrees, minutes, and seconds, click on the Identify icon. When you click on this you will see the word decimal degrees appear to the right of the icons. This alerts you to the fact that the location will be represented in decimal degrees. To change the representation, just click on the word decimal degrees and you will see a drop down menu with the option to change to degrees, minutes, and seconds. To identify a location, just click on a point on the map. You will see a red dot located on the point. You will find your location information in the Measurement box
To go back to Section 2, How to View and Download Mine Maps, click the Back button below.
To continue with the tutorial and learn about Connecting to PHUMMIS, click the Continue button below.

